Home Blog Page 3

Pie Recipes: savory feta and leek pie

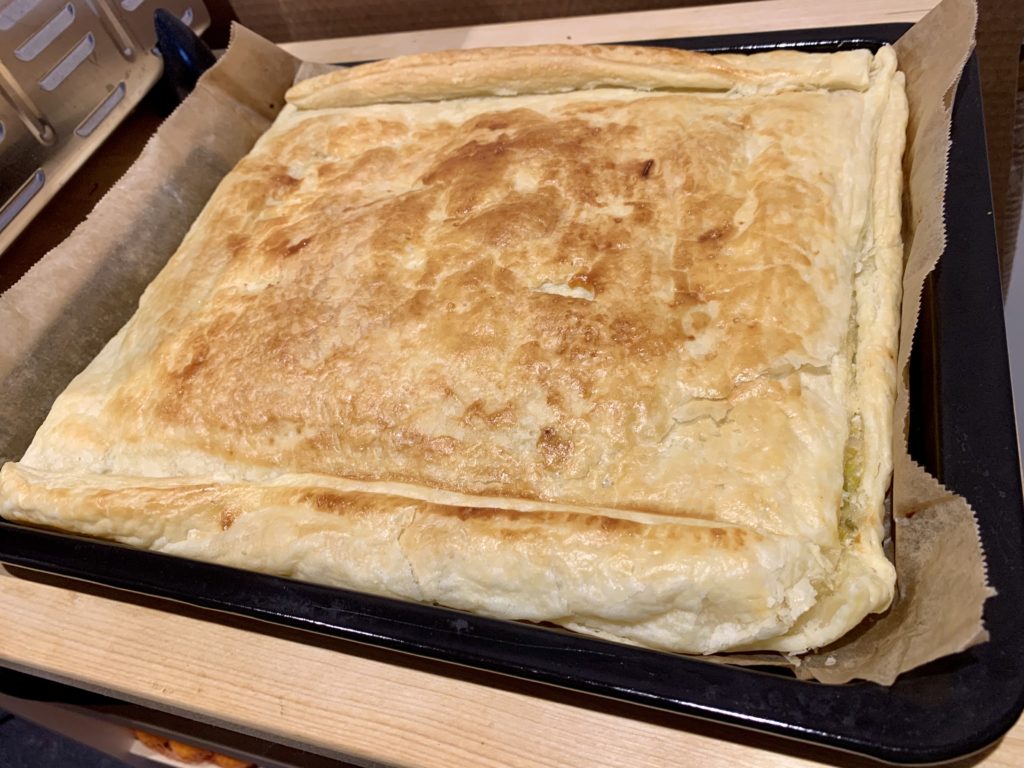
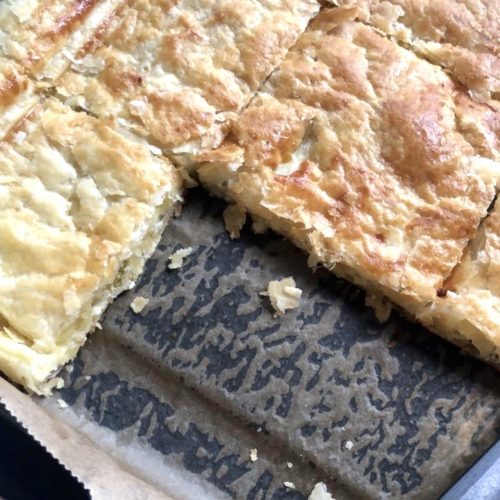
This feta and leek pie will either bring some Mediterranean memories or provide savory goodness with simple and inexpensive ingredients.

This is a staple Sunday lunch at my parents, especially during the summer. It’s so delicious that I can’t even begin to think about it.

Usually, the key delicious component here is the dough type. For the case of this recipe, we are using the tastiest is the pastry dough. The later is extremely versatile and easy to handle.

Some of the key comments that you should take with you:

  1. pastry dough gets warm fast – so keep it in the fridge till before you start forming everything up.
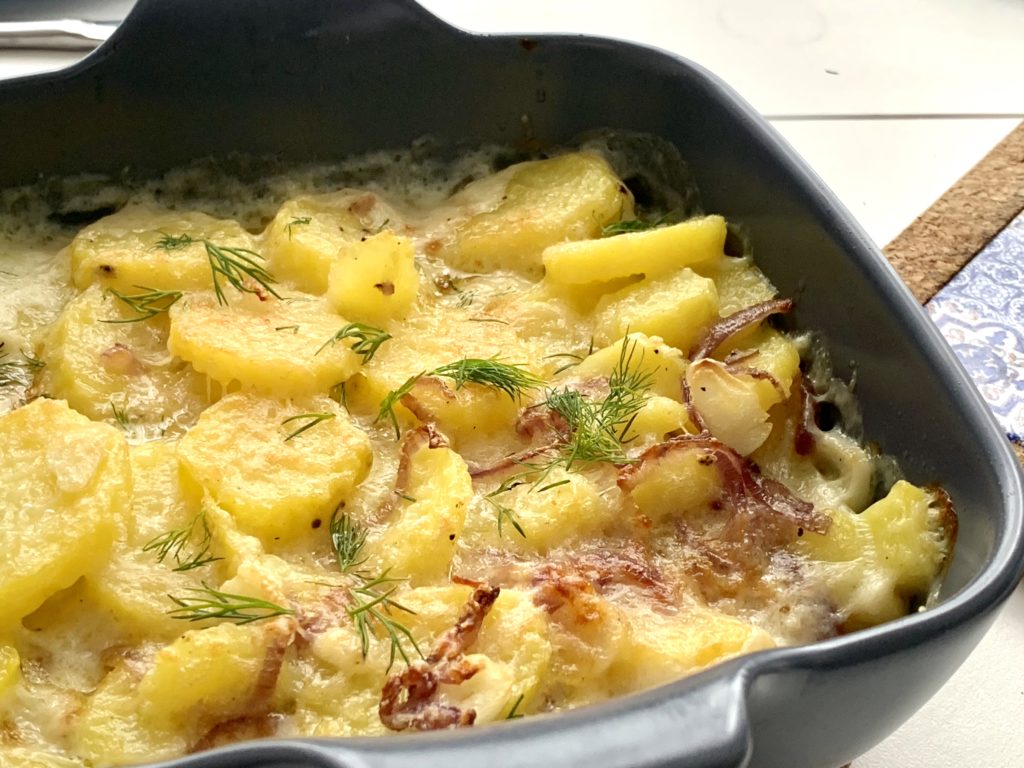
  2. the general approach is that you use pastry dough can be filled with almost everything savory or sweet that you can think of. We have added some other savory pie recipes for your general ideas such as a spinach and feta pie or tomato pie. They are all interesting and have their own approach.
  3. You can approach it as a simple pocket or a general big pie depending on the specific pan that you will be using.

Having said that, there is a big basic recommendation to be taken into account when it comes to savory pies. The filling has to be properly savory, interesting, spiced up properly. For example, we are using freshly ground black pepper on the leek and feta pie. The reasoning behind is that the pepper, even after baking is always there, part of everything.

Check my youtube for a general idea on how to cook in a kitchenette.

feta and leek pie

Read the full detailed recipe here

feta and leek pie

Feta and leek pie

This feta and leek pie will either bring some mediterranean memories or provide savory goodness with simple and inexpensive ingredients.
5 from 1 vote
Prep Time 10 minutes
Cook Time 45 minutes
Total Time 55 minutes
Course Appetizer, Main Course
Cuisine Mediterranean
Servings 2 people
Calories 500 kcal

Equipment

  • pan
  • oven
  • oven tray

Ingredients
  

  • 2 pc medium leeks
  • 50 gr Feta cheese
  • 1 egg
  • 50 ml milk
  • 2 pc pastry dough
  • olive oil
  • salt
  • pepper

Instructions
 

  • Peel the leeks and cut them in the middle, then in small pieces. Put the chopped leeks in water to thorogly clean them
  • After the leeks are cleaned, in a hot pan with olive oil and medium-low heat, let them sweat. Do not forget to make sure to mix them every once in a while. About half-way add some salt and a generous amount of freshly ground black pepper
  • The leeks are done when they are soft. It will taka e bit of time – around 30 minutes in a medium low heat in the pan.
  • Once the leeks are done, take them off the heat and let them sit for a bit.
  • Preheat the oven at 200 degrees
  • In a big bowl mash the feta cheese and add the egg and the milk. Mix them throughly
  • Add the leeks in the feta mixture and combine.
  • In an oven tray, covered with some parchment paper, lay in one of the pastry dough
  • Throw in the leek and feta mixture and spread it around. Keep in mind that you should leave some space on the sides, so you can stick the top pastry paper with the bottom one
  • Cover the whole thing with the other pastry dough and with a fork press on the sides so a pocket is formed.
  • Make some egg wash and spreadh on top of the pastry for a golden crisp – alternatively do not bother with this step.
  • With a fork, make 3-4 holes on the pastry dough
  • Place it in the oven for 15-20 minutes. It is done once the bottom is not soggy anymore.
Keyword feta, leek, pie, savory

Tagliatelle with shrimps and zucchini

These tagliatelle with shrimps are a staple seafood pasta dish almost everywhere. Add to that a bit of zucchini for body and cherry tomatoes for zing and you got yourself a winner!

This is one of those pasta dishes out of which we create sauce out of no sauce. We will be using the starch of the pasta water to make everything so much better without having the need to add heavy cream. This is also one of those dishes that are light and fairly interesting for the summer.

Here are a couple of comments that I need to add to this dish:

  1. Deveining shrimp is something that is fairly optional. While cooking the intestinal track will not be an issue for you. But some people (including me) prefer to remove it. You do not have to though – at all.
  2. For this recipe, you can get pre-cooked shrimp if getting fresh ones is a problem for you. Understandingly it will be a bit rubbery, but it’s not the end of the world
  3. If you have raw shrimp you can easily understand if the shrimp is bad. First of all the shrimp should feel firm at hand while touching it and the shells should be generally unbroken. If the smell is sour and the shrimp is slimy then just throw it away.
  4. I have used the Shrimp heads for adding a whole lot of flavor. While cooking, the shrimp heads pack juices that we want. Alternatively, you can cook the shrimps with the heads, but that is usually a pain to eat – all is up to you though!
  5. Zucchini is a fairly optional component in the tagliatelle with shrimps. I personally like it as while cooking in the liquid it literally is disintegrated and just adds a bit of thickness and complexity to everything.
  6. If this dish is not your thing – then check these shrimp recipes.
tagliatelle with shrimps and zucchini

Creamy tagliatelle with shrimps and zucchini

These tagliatelle with shrimps are a staple seafood pasta dish almost everywhere. Add to that a bit of zucchini for body and cherry tomatoes for zing and you got yourself a winner!
5 from 1 vote
Prep Time 10 minutes
Cook Time 15 minutes
Total Time 25 minutes
Course Main Course
Cuisine Italian, Mediterranean
Servings 2
Calories 300 kcal

Equipment

  • pan
  • pot

Ingredients
  

  • 120 gr tagliatelle
  • any amount shrimps
  • zucchini chopped
  • cherry tomatoes halved
  • 2 cloves garlic sliced
  • 50 ml milk
  • 2 tbsp olive oil
  • 50 ml white wine
  • 10 gr butter

Instructions
 

  • Depending on the type of shrimps that you bought, if they are raw – then rinse them properly, remove the skin and heads till the tail – we like the tail for aestetic purposes. Put the heads aside as we will need them. Devein them if you do not want their intestinal track.
  • Get some water in a big pot and place in high heat. This will be the pasta water.
  • In a hot pan, add the olive oil and the shrimp heads. They are packed with flavor and we want that oil to get that. Sear them for 3-5 minutes and remove them
  • If you have raw shrimps, now it's time to cook them. Add them in and it will take 3 minutes each side. Remove them.
  • Put the pasta in. Let them cook till aldente
  • While the pasta is cooking, add the garlic and sear in the pan that we cooked the shrimps in for 30 seconds. Then add the zucchini and let them get a nice sear.
  • Throw in the halved cherry tomatoes.
  • Throw in the shrimps, combine them together, and then deglaze with something. It can be white wine. It can be just pasta water or some sort of liquor.
  • After the pan is deglazed add some pasta water and bring to boil. I usually add a bit of milk to this mixture and bring it to boil so it softens the tones of the plate.
  • The moment the pasta is ready and the liquid in the sauce is halved, throw the pasta in the pan and start mixing. If it seems that it doesnt have enough liquid add a bit more pasta water.
  • Remove from heat and finish with just a bit of butter.
  • Serve imediatelly
Keyword pasta, seafood, shrimps, tagliatelle, zucchini

Baked salmon with vegetables

A baked salmon with vegetables is always a good idea – especially so when all you have to do is add them in a casserole and just let it bake.

The problem with fish is that it always requires a whole lot of attention and makes a big mess everywhere. Here are the key takes of this recipe:

  1. You can use this approach for every single type of fish fillet that you can think of.
  2. I always cover my casseroles. I help keep everything moist and reduces the chances of you burning it. In the last 10-15 minutes, you can uncover and let it get some good color.
  3. 180 degrees is enough for these types of bakes. You do not need to have it high burning everything up
  4. Potatoes are usually the veggies that take the most to cook. Take that into account when you put them with a delicate fish. I usually pre-boil them and add them the last 15 minutes to get them a bit crispier. If you are out of time, use softer vegetables like eggplant or zucchini. They cook much faster and you do not have to worry about anything.
  5. You can eat this hot or cold. As there is plenty of juices, it will not necessarily dry up once it’s cold. In other words, you can take this baked salmon with vegetables with you as your work lunch and not have to use the microwave

Notably on the vegetables chosen, keep in mind that you can use whatever you want or you see fit. At the time that I am writing this baked salmon with vegetables is the middle of the summer so zucchini and asparagus are very much a good way to go. In the winter you can switch with broccoli and cauliflower. It is such a flexible approach!

baked salmon with vegetables

Baked salmon with vegetables

This baked salmon with vegetables is the staple fish dish concept that you will need. Once you get this, you will be able to tackle all the other types of fish fillets.
5 from 1 vote
Prep Time 30 minutes
Cook Time 40 minutes
Total Time 1 hour 10 minutes
Course Main Course
Cuisine American, Italian, Mediterranean
Servings 2
Calories 250 kcal

Equipment

  • oven

Ingredients
  

  • 3 medium potatoes
  • 400 gr salmon fillet
  • 50 gr green beans
  • 2 medium carrots
  • salt, pepper and olive oil
  • 1 bay leaf

Instructions
 

  • In a pot cold water add the potatoes and let them boil for 20-30 min
  • Peel the carrots and cut them in quarters lengthwise. We are looking for almost bite size quartered carrots
  • Cut both endings of the green beans and wash them
  • Wash the salmon and pat it dry. We will be keeping the skin so if you do not like the feel of scales, remove them. Note that I am picky here but on most of the cases, the skin can be cooked as it comes from the supermarket. Cut it in the portions that you want to serve it.
  • in a caserole add a bit of olive oil and spreadt it around
  • add the veggies and marinate them with salt and pepper. Mix them around and make sure to open a spot with a bed of green beans for the salmon fillets
  • Preheat the oven on 180-200 degrees celcius
  • At this point you have two choices. Either remove the potatoes (as they are not already cooked) and let them finish in the casserole OR let them finish boiling, cut them, and add them in the casserole in the last 10 min for a quick bake. I usually chose the latter as my casserole is a bit small
  • Cover the whole thing with aluminium foil and let it bake for 30-40 minutes.
  • At the 30 minute mark, uncover, increase the heat to 220, add the potatoes and let it be for 10-15 minutes or till the salmon is cooked and the carrots are at your preffered softness.
  • Serve them immeditelly and do not forget to add some of the juices on top
Keyword baked potatoes, baked salmon, baked vegetables,, fish, salmon

Creamy baked potatoes with a cheesy touch

Creamy baked potatoes is one of the most comforting recipes that you need to give your self a pick me up with just milk and a bit of cheese. This recipe is versatile, easy and you literally can’t go wrong with it.

Here are a couple of adjustment points:

  1. We will be using milk instead of cream and will be getting the consistency from the starch of the potatoes.
  2. If you have pre-boiled the potatoes, get a tablespoon of some sort of starch and a tablespoon of water combined together – you will achieve the same result
  3. Depending on how creamy you like potatoes, consider using cream or full-fat milk. I did not have either – I just had 1.5% milk that I usually use for my coffee in the morning.
Creamy baked potatoes

Ingredients

  1. A couple of potatoes, peeled, thoroughly washed and sliced
  2. A small onion sliced thinly – I had red onion. You can use whatever
  3. 1 garlic clove, sliced thinly
  4. 100ml of milk
  5. Olive oil, salt, and pepper
  6. Grana Padano to shred on top

Creamy baked potatoes recipe

  1. Boil the potatoes in salty water. Reserve a bit of the starchy water, like 50-100ml
  2. Strain and put them aside
  3. Start heating the oven to 200
  4. In a deep pan, heat some olive oil and on medium-low heat sweat the onions. We want them translucent and wiggly. Add some salt and pepper to help you through the process.
  5. When almost done, add the garlic clove and mix around for 30 seconds
  6. Add the potatoes once the onions are ready and mix them thoroughly.
  7. Add the starchy water or the starch with water and bring to boil.
  8. At this point add the milk and stir. Bringing it to boil, the whole thing should have thickened a bit.
  9. Add the whole mixture in a casserole and top it off with some shredded grana
  10. Bake it in 200 for 15-20 minutes. As everything is cooked, we are looking for some of the liquid to evaporate and the cheese to melt properly.
Creamy-baked-potatoes-easy

Creamy baked potatoes

Creamy baked potatoes is one of the most comforting recipes that you need to give your self a pick me up with just milk and a bit of cheese.
5 from 1 vote
Prep Time 5 minutes
Cook Time 30 minutes
Total Time 35 minutes
Course Main Course, Side Dish
Cuisine Italian
Servings 2 people
Calories 300 kcal

Equipment

  • oven
  • pan
  • casserole dish

Ingredients
  

  • 2-3 potatoes peeled, thoroughly washed and sliced
  • 1 onion sliced thinly – I had red onion. You can usewhatever
  • 1 clove garlic sliced thinly
  • 100 ml milk
  • olive oil, salt and pepper
  • 30 gr grana padano shreded

Instructions
 

  • Boil the potatoes in salty water. Reserve a bit of the starchy water, like 50-100ml
  • Strain and put them aside
  • Start heating the oven to 200 C
  • In a deep pan, heat some olive oil and on medium-low heat sweat the onions. We want them translucent and wiggly. Add some salt and pepper to help you through the process.
  • When almost done, add the garlic clove and mix around for 30 seconds
  • Add the potatoes once the onions are ready and mix them thoroughly.
  • Add the starchy water or the starch with water and bring to boil.
  • At this point add the milk and stir. Bringing it to boil, the whole thing should have thickened a bit.
  • Add the whole mixture in a casserole and top it off with some shredded grana
  • Bake it in 200 for 15-20 minutes. As everything is cooked, we are looking for some of the liquid to evaporate and the cheese to melt properly.

Video

Keyword baked potatoes, cheap dinner ideas, creamy baked potatoes, easy dinner ideas, potatoes

Tuna tomato pasta with canned goods

Tuna tomato pasta with canned goods is one of those cheap yet filling and nutritious recipes that you can make at the end of the month.

Why is this inexpensive?

Let me put it in perspective, shopping in one of the most expensive supermarkets here in Germany – which is Rewe; here are the prices:

  • 1.19×2 for two tuna cans,
  • 0.89×1 can of crushed/chopped/whole tomato,
  • any type of pasta like penne 1.69×1
  • = 4.96 for 4 portions is 1.24 eur per portion.

Note though – I would not cook for 4 people, but usually for 2 as it is easier and more manageable in a kitchenette and you make less stuff dirty.

Tuna tomato pasta

Ingredients:

  • 1 can of tuna, preferably in olive oil so we can use that oil
  • half of an onion
  • one garlic clove
  • half a can of crushed/chopped/whole tomato
  • some sort o pasta
  • Maybe just a bit of milk or some sort of hot pepper to make things interesting
  • Salt and pepper to taste

Tuna tomato pasta recipe

  1. put a bit pot with water to boil. Add a bit of salt and pepper.
  2. Chop the onion and the garlic finely
  3. Add the oil of the tuna in a hot pan and cook the onions and garlic in a medium-high heat till translucent. While cooking them marinate with salt and pepper – salt will help the cooking easily. If you want to add some hot peppers, now it’s time to chop them and add the min.
  4. Add the tomatoes and bring to boil. I usually add half of the size of tomatoes in water just to make the reducing a bit easier. Add a pinch of sugar if you are using real tomatoes.
  5. Lower the heat and reduce. I usually add the tuna at this point, as it incorporates better and you have a very good idea of the amount of the sauce.
  6. I usually reduce the sauce within the time it takes for the pasta to cook. So just start cooking the pasta now. They should be done in like 8-10 min depending on the manufacturer
  7. Sometimes depending on the feeling, if you don’t want it to be too tomato-y I cut the sauce in the end with a bit of milk – it will make the sauce smoother. In this case, I did not.

Check out my other pasta recipes if you feel it tho.

Fried chicken burger – The burger series

The fried chicken burger is one of those staples of burger making that you need to learn and understand to simplify your life.

I have found that during my cooking journies, my burger-making has always been fairly classic. By that I mean that a burger for me is a toasted bun, with ketchup and mayo, with lettuce, the meat, cheese, tomatoes, onions, pickles and that is it. Following the same approach, I have been experimenting with changing the meat.

During this process I have tried:

  1. A pan-fried chicken burger meat: which turned out to be the best as it retains a whole lot of composure
  2. A deep-fried chicken burger: I mean it’s good and all, but to be honest, you just need too much oil, and it will eventually be too oily which in turn would the whole thing to be oily as well. To be noted though – I am not an expert in deep frying
  3. A simply grilled chicken breast: which unless grilled in charcoal is dry and fairly liquid-less in a burger. I would not recommend
  4. A skinless and boneless chicken leg, pan-seared – which is outstandingly delicious but very tedious to get right and cook properly as it’s not the same thickness all around
  5. Air frying it: Have not tested and don’t know for sure.
fried chicken burger

Ingredients:

  1. Chicken or turkey breast
  2. 1 egg, beaten
  3. A bit of flour
  4. Breadcrumbs – panko if you have it
  5. Salt, pepper
  6. you favorite burger accouterments – but think about honey mustard as that is very much needed when it comes to chicken

Fried chicken burger recipe

  1. Out of chicken or turkey breast, cut it in thin fillets. Marinate it with salt and pepper. Use a meat mallet on a plastic wrap to flatten it up. This is cooked faster and requires less oil.
  2. In a hot pan add some cooking oil. We are looking for almost floating fillets.
  3. Dip the fillet in flour (which you should have marinated with salt and pepper) and cover them all around. Make sure to remove the excess flour and then dip it in the egg mixture. Afterward, finalize in the breadcrumbs. Cover it all around and again shake the excess.
  4. Slowly put the fillets, away from you in the pan. The thin ones would cook for 3 minutes each side, covered.
  5. Melting cheese on top of the fillets requires 1 minute with a covered pan on a medium heat – so if you have more chicken fillets than pan space, you have to plan a bit ahead. Sometimes I just get all the chickens done, and then step by step melt the cheese. The better option would be the actually melt the cheese once the chicken is almost done.
  6. Add your favorite accouterments. I added a bit of mayo and ketchup on the bottom toasted bun;
  7. That’s it. Eat it on the spot.

Check out my burger series for more.

Easy quinoa salad – mastering the fluffy quinoa

Making an easy quinoa salad is a matter of a selection of specific steps that you can not go wrong. Follow them to the letter and you will have the fluffiest of them all.

Mastering the quinoa is simple – do not focus on getting fancy with it. Cook the quinoa separately and then add everything else to it. This way you can not mess up anytime.

Another important component is that whatever you add to the quinoa, you have to treat it as a salad – so all the ingredients that you add have to be cooked, marinated and ready.

Ingredients

  • 1 part uncooked quinoa
  • 2 parts of water
  • Salt, to taste
  • A squeeze of lemon
  • Olive oil
  • Your selection of veggies

Easy quinoa salad recipe

  1. Start by rinsing the quinoa as that is the most important part of the process. It will improve the taste and get rid of the bitterness that sometimes it is characterized.
  2. In a deep pan/saucepan add the water and quinoa. bring to boil and then lower the heat to low so the whole thing is gently simmering. Do not cover though. The quinoa will retain the water and once the water is evaporated you are ready for the next step.
  3. Cover the pot, and remove from heat. The steam will do to the quinoa what it does to popcorn – pop.
  4. Remove the lid and mix the quinoa with a fork. Season with salt, to taste.
  5. Add your veggies and meat. For my selection, we have some greens, sauteed corn, oven-baked zucchini, and chopped turkey breast. Think of the quinoa like a salad – everything that you add to it should be cooked.
  6. To make everything pop, add a bit of good olive oil, some chopped fresh tomatoes and a squeeze of lemon.

Check these other pasta recipes if you feel that you want to pasta-it-up and obviously our video recipes on youtube.

Baked salmon with mayo – an easy dinner idea

A baked salmon with mayo is a foolproof way to work with a simple salmon recipe and not mess it up. It is perfect for a novice cook that is scared of seafood.

One of the key components that you have to take into account, that you have to dry the salmon with paper towels before you add the sauce. Also, make sure the salmon is room-temperature-ish. This will allow for a fairly easier and smoother cooking process.

In regards to the mayo – just so that it makes sense for you why we are using it – the mayo acts as a moisturizer and as a cover to keep the salmon moist without burning it. You can use this for a whole lot of different choices.

Now what we do here is that we will make this mayo a bit tastier, so it’s just not a boring fat dollop. As such we kinda have to elevate the taste by helping it pair with fish with a bit of lemon juice and then taking it further with some fresh herbs. The best choice here is dill, as it also complements very well with seafood.

Ingredients:

  1. Salmon fillets – depending on how much you will do
  2. One tablespoon of mayo for each salmon fillet
  3. A squeeze of a lemon
  4. Some sort of fresh greens – like dill, parsley – whatever
  5. Salt and pepper.

Baked salmon with mayo recipe

  1. Preheat the oven at 180 degrees
  2. Mix the mayo, the fresh greens salt, and pepper. Mix thoroughly. I usually add the olive juice – I would squeeze a quarter of a lemon per mayo tablespoon. Mix again.
  3. Dry the salmon properly and marinate it with salt and pepper.
  4. In a small casserole, add a bit of the sauce on the bottom, place the salmon, and then coat the salmon with the rest of the sauce
  5. Bake for 20 min or so.

Check out other salmon recipes or even my foodie instagram.

Creamy mushroom risotto – with no cream

This creamy mushroom risotto is achieved only if you do it the original way – where you add water bit by bit and reduce till ready based on your taste.

Ingredients:

  1. 200-300 gr of fresh mushrooms (but here feel free to add more if you like mushrooms)
  2. 1 onion (would recommend red onions here, but whatever you got works usually)
  3. a bit of garlic
  4. butter and olive oil
  5. a bit of stock
  6. rice
  7. Some pecorino to finalize

Creamy mushroom risotto recipe:

  1. Finely chop the onions and the garlic
  2. In a hot pan, on medium heat add a bit of olive oil. and throw in the chopped onions and garlic
  3. Let them sweat a bit till translucent
  4. Throw in the chopped mushrooms and cook them until the water that they retain, evaporates.
  5. Add salt and pepper and taste it to make sure that it is properly salty.
  6. Throw in a bit of butter as the mixture will stick with the rice better – now this is optional
  7. Add the rice in the mixture and mix it up. We want the whole thing to be fully integrated with the rice
  8. In medium heat, start adding the water or chicken stock bit by bit. I usually go for 1 part water, 1 part stock and 1 part rice. If you do not have stock, no worries – you just need to add a bit more seasoning.
  9. So this is how you do it. Add the liquid bit by bit and evaporate. Now I was using risotto rice – which is the more rounder looking rice so depending on what you have – the time will vary. As you will mix it constantly, give it a try every once in a while – once the rice is soft, it’s done. That’s the reason why we do not add all the liquid so that we control how liquid the risotto will be
  10. Remove from the heat and add a bit of shredded pecorino – this thing does wonders.
  11. And it is ready.

Want more risotto recipes? Check these risotto recipes or my instagram.

Pie Recipes: savory spinach and feta pie

For me, savory spinach and feta pie is a staple of the summer when the spinach is fresh and your Sundays are bliss. This is an oversimplification of the recipe so that everyone can enjoy this savory goodness.

First and foremost I would highly recommend using fresh spinach for this – but if you don’t have it, then frozen will be just fine as well.

Ingredients

  1. About 250gr of fresh spinach
  2. One garlic clove
  3. 50-100gr of feta cheese depending on how cheesy you feel
  4. One puff pastry from the supermarket

Savory spinach and feta pie recipe

  1. In a cold pan, add the spinach and turn on the heat to medium.
  2. Let the spinach sweat it out. It may seem like a lot of spinach, but it’s not. Just mix it around.
  3. Once the spinach sweats and the water evaporates, add a bit of olive oil and the garlic. Marinate it as you see fit.
  4. Cook it for 5 minutes and remove from the heat
  5. Crumble the feta on top and mix it up. The residual heat will melt the feta cheese and this is what you should aim for.
  6. Now give it a quick taste. Adjust if necessary.
  7. Cut the pastry – mine took 4 rectangles.
  8. Heat the oven at 180 degrees
  9. Add a tablespoon or so of the spinach mixture to the pastry on one half and use the other half to cover. Use the fork to stick together the parts.
  10. Do the same thing for every single one of the 3 other rectangles.
  11. Place them in the oven tray
  12. The best thing would be to give them a quick egg wash on top – but you know – I did not have any leftover eggs at that time, so this is without.
  13. Bake it for 15-20 min or till the puff pastry is cooked properly.

Take it out of the oven and let it chill for a bit. Also, check out my youtube channel for more and this amazing salmon pasta for another easy dinner idea or any other pastry recipe.